Skip to content

Month: February 2016

10 Tips For Picking Paint Colors

Painting Tips from Dunes Painting

[vc_row][vc_column][vc_column_text]Why do we find one place appealing and are uneasy in another? Why are we attracted to one product over another? Color—whether architectural or in products—accounts for 60 percent of our response to an object or a place.

The “buzz” about color is usually called “color psychology.” But the effects of color are subtle and significant; physical and psychological. Color use is not something that results in a definitive equation between “color and our moods,” as is a currently popular expression. Wherever we go we respond to color, but the importance of color is often underestimated. Color use is important to us personally in our homes and in the places where we work.

Start Small

If you’re not sure where to begin with color, experiment in a powder room or bathroom, a small hall or area between rooms, or an accent wall. If you’re doing your own painting, pick an area that’s quick to do so you can see your results sooner, and be happy with it or change it. Look at the process as an adventure.

To get started, select a favorite color drawn from artwork, a rug, dishes and an accessory or furniture piece as a main color or accent.

beasley-yellow-brown-living-room

Think About Your Mood

When selecting a color, consider the mood of a room. In a bedroom do you want the feeling to be restful and soothing or dramatic and intimate? Soft, cool colors and neutrals usually create a quieter feeling while stronger colors are for drama.

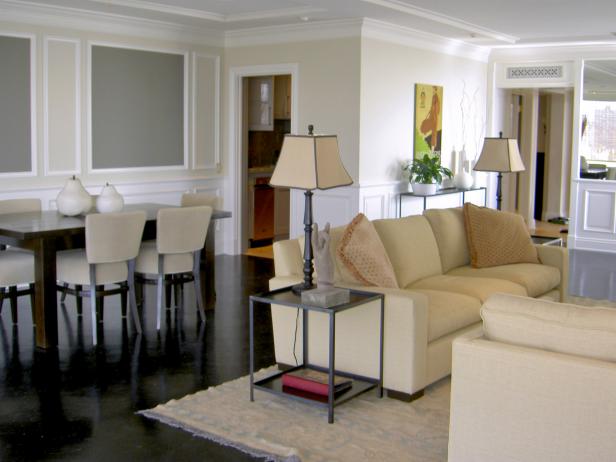
Do you want a dining area to feel sociable and stimulating or appear formal and quiet? Warmer, contrasting and somewhat brighter colors add to a sociable atmosphere; deeper blue-greens and neutrals will give a more formal ambiance.

Do you want kid’s rooms to create an active and exciting energy or an orderly and restful feeling? Be careful not to overstimulate your children with intensely bright hues. You may not know it, but some brighter colors can lead to unrest and irritability.

Pay Attention to Lighting

The reason why paint stores have light boxes for you to test paint chips:

  • Natural daylight shows the truest color;
  • Incandescent lighting brings out warm tones and yellows;
  • Fluorescent lighting casts a sharp blue tone.

So, a strong color might be too bright and overpowering when used on all walls or next to a large window, but it might be effective when used as an accent wall with indirect light.

Charalambous-Andreas-Red-Living

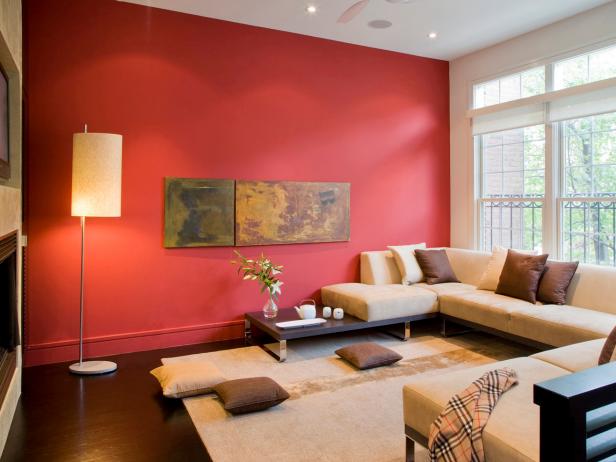
Design by Andreas Charalambous

Learn the Color Terms

It helps to understand the terminology used to describe color.

  • Hue is what we call a color. Red is the hue; blue is the hue.
  • The value of the hue is how light or dark it is.
  • Saturation refers to how dominant the hue is. As we go from red to pink, the red hue becomes less dominant.
  • Intensity is the brilliance of the color. The pure colors such as red are more intense than the combined colors such as yellow-green. A stronger intense color usually has a more dominant hue.

If you want a more active space, consider introducing stronger, more intense color. Even if you want a light-colored room, choose colors that are slightly more saturated than off-white or light pastel. Very light color can feel bright and stark when it appears on all surfaces in a room. However, two or more medium-light, closely related pastel colors can create a luminous effect when used in the same room.

dp-riehl-living-room_s4x3

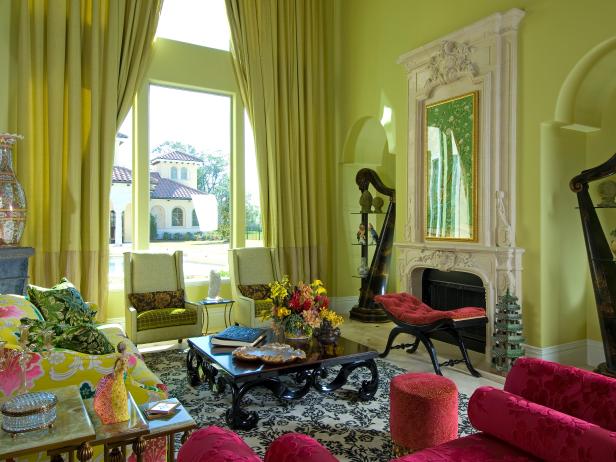
Design by Shelly Riehl David

Test Your Color Choice

Boost your confidence by testing colors on poster board or large areas of a wall. Don’t be afraid to go beyond your comfort zone: Consider strong, vivid colors or soft, deep neutrals like chocolate brown or olive green as main or accent colors. Or add drama with a stronger color on the ceiling. Tinted ceilings can dramatically change the whole look of a room.

Painting Tips from Dunes Painting

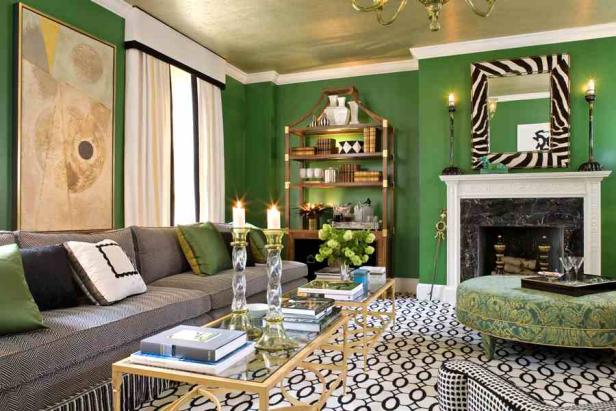
Design by Sherrill Canet

Add Depth With Decorative Finishes

Transform flat, dull walls into interesting and personal spaces with subtle or dramatic visual texture and broken color. Burnished mineral/metal finishes and layered colored glazes add depth. Some examples of softly reflective metals are mica, copper, pewter, bronze and, of course, antiqued silver and gold.

Painting Tips from Dunes Painting

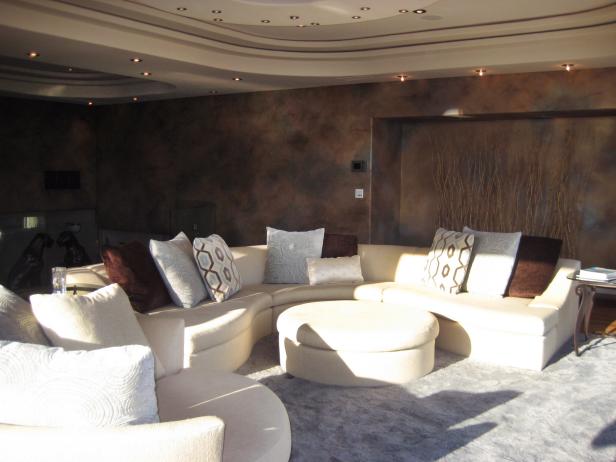
Design by Payton Addison

Walk Into Another Room

Consider walls as planes of color, and see how they interact when viewing one next to the other in adjacent rooms. Approach it like a composition: You’re in one room, but you’re going to see a piece of another room through it. So as you’re choosing colors, consider how they will flow from room to room to create your picture.

Painting Tips from Dunes Painting

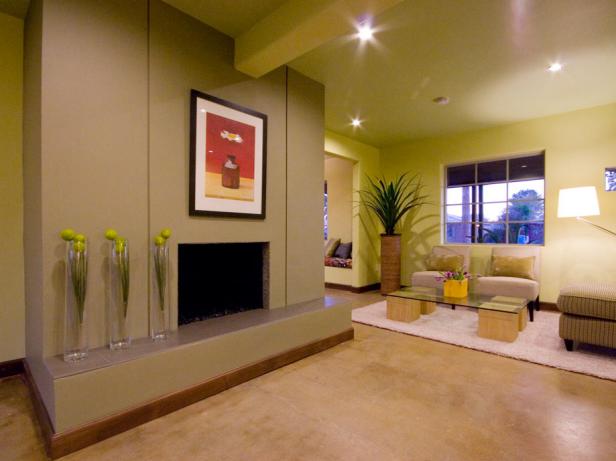
Design by Amy Bubier

Follow the Color Wheel

A small color wheel is a great reference tool for modifying and intensifying two or more colors. For example, red and green, which are complementary (opposite) colors, are most intense when used together. You may be surprised at how many combinations function beautifully together, and you may even become attracted to entirely new color palettes. The color wheel also illustrates the visual temperature of a color. Draw a line from the yellow-green mark on the color wheel all the way down to the red-violet; you’ll see that all the colors on the left are warm and the colors on the right are cool.

Painting Tips from Dunes Painting

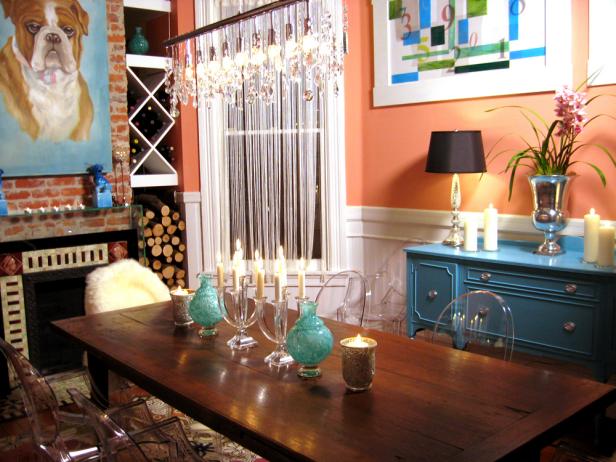
Number one color rule for a small space? There are no rules! Mixing colors can help bring a personal touch to your space.

Play Up Monochromatic Schemes

Think one color is boring? Create bold or subtle variations within one color group with contrasting paint finishes. For example, use closely related colors, or try a single color in different finishes, for walls and trim in one space.

For an accent color, select a warmer (more toward reds) or cooler (more toward blues) color to complement your main color group. For a quieter ambience, make sure your colors are not extremely bright. White or an off-white tint can be a striking accent when used as trim with a monochromatic color group.

Painting Tips from Dunes Painting

Design by Nicole Sassaman

Choose Different Paint Finishes

A single color used on walls and trim takes on new significance when applied in different finishes. For example, wall and trim colors can remain the same hue, but use an eggshell (matte and less reflective) finish on walls and a satin or semigloss on trim. The color will appear slightly different on each surface. It’s a good way to create a cohesive look in rooms with many windows and doors, and relatively little wall area.

Painting Tips from Dunes Painting

Design by Lori Dennis

[/vc_column_text][/vc_column][/vc_row]

Emily Coleman

[vc_row][vc_column][vc_column_text]What can I say about this company, that hasn’t already been said!
From A to Z done with class!
Found my company for life!
Keep up the great service & work! Thank you

From Google Reviews[/vc_column_text][/vc_column][/vc_row]

How To Wallpaper

Hanging Wallpaper

[vc_row][vc_column][vc_column_text]

Applying wallpaper is one of those household projects that has a very simple procedure but can go wrong for many small reasons you may not consider. Follow these instructions to ensure you’re not making any hidden mistakes and hurting your next wallpapering effort.

Step 1 – Inspect the Surface of Your Wall

Don’t be reductive when thinking about wallpapering. Your wall may appear flat, and your wallpaper may seem smooth, but without making proper preparations to your surface, your final result won’t look good.

The walls must be in good condition before you can hope to take a stab at putting on any wallpaper. This means that any imperfections like holes or cracks must be repaired, and any blemishes like mildew must be removed.

Step 2 – Check the Condition of Any Paint

If the wall that you intend to lay wallpaper on has a preexisting coat of paint on it, you may or may not have a complication. There are two quick tests you can perform to check the condition of painted walls, and the results will either give you the green light to apply wallpaper or indicate that more preliminary work is needed.

Sponge Test

To test your paint, hold a damp sponge against the wall for about 15 seconds. Then wipe the area with a cloth vigorously. If very little paint comes off, the painted surface is okay and should be capable of accepting wallpaper. If a lot of paint comes off, the walls should be washed thoroughly – or sanded and washed – to remove the paint before you attempt wallpapering.

X-Incision Test

The second test involves cutting three small Xs into the wall’s surface. Place a piece of scotch tape over each X shaped incision, and then yank the piece of tape off the wall. Once again, a small amount of paint transfer means that the surface is ready for the following steps, but a lot of paint coming off means you need to sand and wash the walls.

Step 3 – Be Smooth

The ultimate goal in the preparation stage is to provide a smooth finish for materials such as wallpaper to adhere against. Walls painted with gloss or semi-gloss paints should be sanded to dull the surface.

For new drywall, be sure the areas along the joints and over nail heads are thoroughly cured and sanded smooth. New drywall should be primed with an opaque or a white primer.

All sanded surfaces should be primed before hanging wallpaper, and any stains like grease, grime, or adhesive residue from a previous wallpaper should be cleaned and primed with a stain killer or primer.

Wall liners provide some exception to this rule, as they allow wallpaper to be placed over rough surfaces like paneling and masonry block. This is still a risky option and should only be attempted under ideal conditions. Be aware that if you do plan to use wall liners, your choice of primer will be crucial, as you’ll need especially good adhesion between the surface and the wallpaper.

Step 4 – Determine How Much Wallpaper You’ll Need

To determine the amount of paper you’ll need, first measure the height of the wall from the top of the baseboard to the ceiling or bottom of the molding. Next measure the length of each wall.

Add the measurements of the wall lengths together. Find the total number of square feet by multiplying the wall height by the combined length measurements.

Roll Sizes

If your wallpaper pattern does not repeat, or if it repeats every 0-6 inches, each roll yields approximately 25 square feet. If your pattern repeats every 7-12 inches, each roll yields approximately 22 square feet. This goes on depending on your pattern.

Divide the total number of square feet to be covered by the number that is appropriate for your pattern. This is the total number of single rolls of paper you will need for your wallpaper job.

Wallpaper is usually packaged in single or double rolls. To find the number of double rolls you need, divide the number of single rolls by two. To find the number of triple rolls you need, divide by three.

Ask a store associate for help if you’re unsure how much wallpaper to purchase even after these calculations.

Step 5 – Measure and Mark

Place (but don’t adhere) first strip of wallpaper to the right of a door or window. Using the edge of a door or window frame provides a definitive starting point and makes any break in the pattern of the paper less conspicuous.

Measure the width of the wallpaper and subtract 1/2 inch. This 1/2 inch reduction allows for the paper to overlap the adjoining wall.

Mark the width of the wallpaper less 1/2 inch on the wall to the right of the door or window where you will begin. Line up a level on this mark and draw a pencil line lightly from the ceiling to the floor. You may need to reposition your level several times. Be sure to line it up carefully each time.

Step 6 – Mix the Wallpaper Adhesive

Wallpaper paste or wallpaper adhesive can come in liquid form or as a dry, flake-like product that can be activated with water. Either will act as the bonding material that allows your pattern to stick on the wall.

If you are using paste, read the manufacturer’s instructions carefully and follow them exactly. Always use cold water to mix paste. Mix it thoroughly to be sure it is free of lumps.

TIP: Tie a string across the top of your paste bucket where you can attach a brush. This string will keep your brush clean and also give you an edge to slough off excess paste each time you dip the brush.

Step 7 – Cut the Wallpaper

Cut the first strip of paper 4 inches longer than the wall height. Unroll another section and match the pattern before cutting the second strip.

Study the pattern carefully and always match it before cutting. Your first strip will set the bar for how your pattern looks. All subsequent strips should be matched visually while they are still attached to the roll as once they are cut, a mismatch will stay exactly that.

It is usually wise to cut no more than two or three strips of paper before applying them.

Step 8 – Put Paste on Paper

Unroll the strip of wallpaper on your work surface with the pattern side down. Brush an even layer paste on the non-patterned side so that it covers about 2/3 the length of the strip. Brush the paste out evenly and not too thick.

TIP: Add a few drops of food coloring to the paste to tint it slightly. This will make it easier to judge the thickness of the paste and detect any missed spots.

Step 9 – Fold the Pasted Paper

Fold the pasted end of the paper back about 2/3 of the length of the piece so that you put the pasted side to the pasted side, avoiding any creases.

Slide the paper forward on the work surface and apply paste to the remaining 1/3 of the piece. Fold it back over in the same manner. This process where you glue each end of the wallpaper and then fold it back in toward the middle is known as “booking” the wallpaper.

Once you book the wallpaper, allow about five minutes before using the piece. If you have to stop or will not be using the strip right away, place it in a plastic bag to keep it moist.

Pre-pasted Paper

Pre-pasted wallpaper already has an adhesive applied on its backing. The bonding properties of this product are activated when you run the pre-pasted paper through clear water. Plastic and metal dip troughs for pre-pasted paper are available. Cut a piece of pipe or dowel rod an inch shorter than the trough. Lay it in the bottom of the trough over the paper. It will hold the paper under water as you pull it out.

Step 10 – Create a Butt Joint

Carry your long strip of pasted wallpaper from your work surface over to the wall. Drape the folded paper over your arm like a coat. Never open the paper until it is in position to hang.

Use extreme care when placing the first strip of paper on the wall, since all other strips of paper will be aligned to this first one.

Most manufacturers recommend the butt joint. It leaves no ridges at all, but requires a little extra care to make. The edge of one strip is butted up against the edge of an adjoining strip. If you force the two edges together too tightly, it will form a ridge. If they are not placed together tightly enough, you will leave a gap between the two edges. Use the palms of your hands when positioning the paper. Try not to pull on the edges.

It may be necessary to trim the edge of the paper to ensure a proper fit. You can trim the paper with a razor knife and a straightedge.

Step 11 – Position the Paper on the Wall

When the paper is in position for hanging, unfold the top half of the pasted sheet. Overlap the top edge of the pasted paper at the top by about 2 inches. You’ll cut away this overlap in the trimming process.

Hold the edge of the paper with one hand and pull the pasted fold apart. The pasted side of the paper should be held firmly against the wall. Reposition the strip as necessary so that the right edge of the paper lines up with the pencil line you made previously.

Step 12 – Smoothing

Use a smoothing brush to smooth out the top and bottom. Allow the bottom of the paper to fall of its own weight. Brush it out evenly. If you trap some air behind the paper, smooth it out with the brush. If this does not work, pull the paper away from the wall.

Continue to apply each sheet of paper in this same manner. Use care to align the design in each succeeding sheet.

Step 13 – Trimming

Trim off the surplus paper at the bottom and top of each strip. Use a metal paint edger or broad knife and a razor knife to get a clean edge. Change the blade on your knife every strip for better results.

Step 14 – Wash Away Excess Paste

Use clean water to rinse all baseboards, casings, etc., with a damp sponge before the paste dries.

Step 15 – Wallpaper Rolling

Let the paper dry about 15 or 20 minutes, then roll all seams. Use a regular wallpaper roller and roll thoroughly for a neat job. Do not apply too much pressure; you may form paste ridges under the paper or force the paste out through the seam.

Step 16 – Do Your Corners

At the corners, measure from the last full strip of wallpaper to the corner and add 1/2 inch. This 1/2 inch will allow the strip to go into the corner and onto the adjoining wall by 1/2 inch. If your walls are not running straight up and down, you may want to use 1 inch instead of 1/2 inch.

A small slit at the top and bottom of the piece in the corner will make it easier to go around the corner.

For the next piece, measure out the width of the wallpaper from the corner and make a pencil mark. Use your level and make another perfectly straight line from the floor to ceiling as before. This piece will overlap the 1/2 inch strip on the wall from the previous piece installed. For vinyl wallpaper, use a vinyl-to-vinyl adhesive on these corner seams.

Odd and Ends

Be especially careful when trimming paper along the edges around fireplaces, windows, mantelpieces, etc. Sometimes the weight of the paper causes it to tear at its narrowest point.

For outside corners, measure the distance from the last full strip to the corner. Add 1 inch to this measurement. Measure the width of the paper and add 1/2 inch. Measure out from the corner the width of the paper and add 1/2 inch. Make a pencil mark on the wall. Using your level, again draw a light pencil line from the floor to the ceiling. Align your wallpaper with this line and match the pattern as closely as possible. This piece will overlap the last piece by 1/2 inch.

For doors and windows, hang the paper over the edge. Using your razor knife cut away the excess wallpaper. Making small cuts from the corners of the doors and windows toward the center will help you position the wallpaper around these obstacles. After the paper is smoothed, use your edger and razor knife to trim around the doors and windows.

Since all the switch-plates, outlet plates, etc. were removed before papering, you can apply the wallpaper right over these openings. The wallpaper can then be cut with the razor knife and straightedge. Replace the fixture plates for a finished job.

Credit – http://www.doityourself.com/stry/h2wallpaper[/vc_column_text][/vc_column][/vc_row]

Painting Ceilings

Ceiling Painting

Ceilings are the most difficult areas to paint, but well worth the effort. With a few simple steps ceiling painting can be much easier and produce better results. Many of the same procedures when rolling ceilings are the same as the walls.

The general plan for painting ceilings is to prepare the room, repair any damage, cut in the edges with a brush and then apply the paint to the large areas. The best plan is to finish the entire ceiling painting in one session. Allowing the paint to dry at different times will produce visible lap marks.

Preparation

Before starting the ceiling painting remove as much furniture as possible, any remaining pieces need to be moved to the center of the room.

Cover FurnitureCover the entire floor with good drop cloths and the furniture with lightweight plastic.

Plastic on the floor will not work. It won’t stay put and will stick to your feet.

Place masking paper over the tops of the window and doorframe. Also cover any windowsills. These areas can be completely covered with plastic masking film for extra protection. Use a hand held masking machine for the paper and plastic.

Any remaining items will need to be covered with light weight plastic. Hanging pictures and unmoved furniture are good examples. Completely covering the walls is not necessary if a quality roller cover and quality paint is used.

Cover WallsRemove the light fixtures if you are confident in doing so. If not, loosen the fixture so you can easily brush around it, dropping it a small distance from the ceiling.

This will speed up the time to cut around the fixture with a brush. Drape plastic or masking paper over the light fixture to protect it from any splatters.

A ceiling fan can be masked with either masking paper on the blades or draped with plastic and taped secure. Most fans have a removable cover over the motor. Remove this cover if possible.

Repair drywall cracks and any damage before proceeding with the ceiling painting. Stains from water damage need to be sealed with a stain blocking primer. Apply 2 coats to be sure the stain is fully sealed. Use an appropriate interior primer for your particular situation.

Tools for Painting Ceilings

The best tools are the same as for painting walls. Use a 9-inch paint roller frame and a lambs wool roller cover.

The thickness of the cover depends on the amount or lack of texture on the ceiling, 1/2 inch for smooth and 3/4 inch for textured ceilings.

A roller pole is necessary and will save you a lot of time and effort. Choose a roller pole that is comfortable to use and extends far enough to reach over any obstacles.

To complete a professional roller set-up use a 5-gallon bucket and roller screen instead of a pan. A good paintbrush is needed to cut-in the edges and around any light fixtures. A 2-1/2—3 inch brush will work well. Use a size and style you are comfortable using.

Good tools are as important as quality paint.

Ceiling Paint

The type of paint and sheen will affect the overall appearance of the ceiling.

  • For most ceiling painting jobs I recommend a high quality flat paint. Flat paint will dry evenly and is less likely to show roller lap marks. Plus flat paints can hide some imperfections.
  • Areas with high humidity will need a paint with at least a little sheen. Satin sheen acrylic paint is a good choice for most bathrooms. Semi-gloss can be used if more water resistance is needed, such as ceilings in shower stalls.

Typically top quality acrylic paints are thick and will need to be conditioned before use. Add a paint conditioner, such as Flotrol, instead of water. Water will make acrylic or latex paints splatter and drip more. For oil base paints use Penitrol instead of mineral spirits. Most oil base products won’t need any conditioning for rolling.

General Ceiling Painting Methods

For most ceilings I like to use a brush and roller. Of course a ceiling can be sprayed using an airless sprayer. I recommend this method for painting acoustic ceilings. Choosing to spray a ceiling will require a lot more masking and covering.

Painting ceilings with a brush and roller is a very “user friendly” method, needing the least experience and investment in tools. The steps needed are brushing next to the walls then rolling the paint using an efficient pattern. Brushing should occur first, if one coat of paint will be applied. For two coat applications quickly roll the ceiling then cut-in twice while waiting for the ceiling to dry.

Brushing

Start by cutting in the edge of the ceiling at the walls with your brush. Bring a strip of paint out on the ceiling 3-4 inches wide. If the light fixture is accessible cut it in as well. If not, brush around it at the end of the ceiling painting.

Careful and slow brushwork is needed in order to have a straight line. Take your time.

Tape doesn’t work very well, but can act as a guide making this task a little easier. Try to apply the smallest amount of paint possibe next to the tape, dry brushing, to reduce the amount of seepage under the tape.

Flat Ceiling Painting

Roll in a straight-line pattern. The use of a “W” or “V” pattern will spread the paint too thin and is more work than necessary. A straight pattern applied opposite of your main viewing angle will help hide any roller marks. By applying the paint in sections and working back and forth towards the door a wet edge can be maintained.

Ceiling Painting Rolling Rolling Ceiling Painting

Begin rolling the ceiling parallel from the wall opposite of the entry door. An average stroke of the loaded roller will be 4-6 feet. This is about a third of the width of most rooms. Paint a section, 4×4 or 6×6 area, and then move over and repeat.

Blend each section while rolling by continuing each stroke into the previous section, overlapping 6 inches will be enough. Keep repeating this back and forth pattern until finished.

Rolling this way works great for smooth ceilings and paints that have a sheen, such as satin and semi-gloss. Ceilings without any texture are the most difficult to paint. Textured ceilings, orange peel and knockdown, are much easier.

Don’t press to hard on the roller. This will produce unnecessary splatters and drips. Plus, leave lines of thick paint coming off the ends of the roller cover.

Experiment on the first couple of strokes. Be careful when rolling close to the walls. To help this situation roll a band of paint next to the wall, do this as you roll a section. This will extend the brushed areas another 9 inches.

Vaulted Ceiling Painting

Painting Vaulted CeilingsPainting a vaulted ceiling with a roller is exactly like painting a wall. Cut-in all edges including the peak. Brush the paint 4-6 inches out from the corners and pay special attention to areas that can’t be reached by the roller.

Begin applying the paint near a corner. Spread the paint in a straight-line pattern, overlapping each stroke into the previous one. Paint 1/2 of the ceiling at a time. Reduce the chance of hitting a wall by rolling slowly as you near the wall.


Source – http://www.house-painting-info.com/articles/ceiling-painting/

5 Smart Tips For Painting Your House

Exterior Painting Company In Myrtle Beach, South Carolina

5 Smart Tips for Painting Your House

A fresh paint job on the outside makes your house look nicer and last longer. Follow these quick tips to get a nice, even look. (And if you’re planning to paint your interior walls, check out our tips here.)

1 5 Smart Tips for Painting Your House

Few home-maintenance projects are as important as exterior painting because paint and caulking form the first line of defense against rain, snow, and ice. And a nice paint job will enhance the curb appeal and resale value of your home, too.

You want to repair and repaint as soon as you notice paint starting to crack, blister, and peel. Ignoring these problems will lead to a much more extensive—and expensive— job. Below are seven exterior painting tips every homeowner should know, whether you’re planning to paint the house yourself or hire a pro.


2 Paint Options

There are two basic types of exterior paint: water-based latex and oil-based alkyd. Latex cleans up with soap and water, dries quickly, has low odor, and remains flexible longer so it’s less likely to crack. The best quality latex paints contain 100 percent acrylic resins.

Alkyd paints require mineral spirits (paint thinner) for cleanup as opposed to just soap and water. But many professional painters prefer alkyd paint because it’s durable, stain-resistant, flows very smoothly, and dries with fewer brush marks. But alkyds have a strong solvent smell and dry very slowly.

The one you choose is up to you. Just remember that if you’re applying latex paint over an existing alkyd paint, you must first prime the surface to ensure the new topcoat will adhere to the old oil-based paint.

Paint Prices

There’s no absolute formula for picking the best paint for your home. Most paint manufacturers offer a wide variety of paints ranging from good to better to best. As a general rule, budget how much you want to spend on the project and then buy the best paint you can reasonably afford, because cost is an excellent indication of quality. Expensive paints contain more pigments than bargain paints, so they produce a thicker, longer-lasting, more protective coating.

Read the Label

Few homeowners bother reading the tiny print on the paint can label, but they should. There’s a wealth of information printed right on the can that can help you produce a beautiful paint job. Pay particular attention to the instructions about prepping the surface and outdoor air temperature. Most paints shouldn’t be applied when the temperature is 50 degrees F or colder. But some paints are specially formulated for application when the temperature is as low as 35. Just take the time to read the label before you start painting and before the label becomes smeared with paint and impossible to decipher.


3 Prep the Surface

For the new paint to adhere to the surface, you must clean the house’s exterior of all dirt, grime, mildew, and chalky residue. A power sprayer provides the easiest way to accomplish this, but hand scrubbing with a stiff-bristle brush is just as effective and often doesn’t take much longer because it requires little preparation and setup time.

Use a hammer and a nail set to tap all nailheads below the surface, then fill the holes with exterior-grade putty. Once the putty is fully cured, sand it flush. If you’re applying new caulking around windows, doors, and trim, be sure to use a caulk that’s paintable.

You can paint directly over the old painted surface as long as it’s in good condition. Be sure to scrape and sand any spots where the old paint has blistered or flaked off. And you must prime any bare wood before you paint it.

4 Brush or Roller? Yes!

The fastest, most effective way to apply exterior paint is with both a paintbrush and a roller. Brush paint onto narrow surfaces, edges, and smaller areas, and use a short, small-diameter roller to paint large and long surfaces such as siding and trim.

Start in the Shade

Painting in direct sunlight or applying paint to a sun-baked surface will make fresh paint dry too quickly. As a result, it won’t adhere well and will blister and flake prematurely. So begin painting on the shady side of the house. (If the surface is damp, wipe it dry.) Then wait for sun to move and the other sides of the house to become shaded—or just paint on an overcast day.

5 Take it From the Top

Start painting near the top of the house and work your way down. Apply paint to the butt or bottom edge of the siding first, then paint the broad surfaces. To avoid lap marks, always try to brush from one wet surface onto another wet surface. When that’s not possible and you must paint onto a previously painted and dried surface, overlap onto the dried-paint surface by several inches.

And since you’ll be working high up, don’t forget basic ladder safety: Don’t overreach too far to the side or you might topple over. Try to keep your hips within the horizontal rails of the ladder. It’s much smarter to climb down, move the ladder, and climb back up than to risk falling.