
Cutting-in, occasionally called trimming in, is a procedure for painting alongside trim, mouldings or adjoining surfaces normally in preparation of using a roller to fill in the big regions of wall surface with a brush.
Continue readingCutting-in, occasionally called trimming in, is a procedure for painting alongside trim, mouldings or adjoining surfaces normally in preparation of using a roller to fill in the big regions of wall surface with a brush.
Continue reading
On the list of life’s frustrations is spending your weekend painting a room, only to discover it looks as if your five year old tried her hand at the job. Swishy brush strokes or streaks mar a finished paint treatment, ruining the visual aesthetic you desire. When planning to put your home on the market or to simply improve a room’s ambiance, there are a few tips of the painting trade that allow for a more professional finish, even when you’re the nonprofessional at the other end of the brush.

A: Stucco, like many surfaces, can fade – especially when it’s exposed to direct sunlight. But, making it look new again is easy. Quality paint can revive the look of your stucco, giving your home a fresh, new appearance.
A: No problem. Just like any surface (for example, wood siding), stucco can be repainted to suit your color preferences. If you want to achieve a darker shade than your original stucco color, and the surface is in good shape, quality paint can probably provide the coverage you need in one coat. Painting a lighter shade over a darker tone may require two coats. When selecting a new color, don’t forget to coordinate with other exterior colors on your home such as shingles and trim.
A: Most exterior paint products are formulated for application on a variety of surfaces, from wood siding to brick and stucco. The knowledgeable sales people at Sherwin-Williams can tell you about products like Duration® Exterior Coating, and SuperPaint® Exterior Latex Paint. Just tell them a little about your home’s exterior and your goals, and they’ll help you select the coating that will best suit your needs.
A: Acrylic latex products perform the best on stucco. Most do-it-yourselfers find that latex products are easiest to use because they are easy to apply and they clean up with soap and water Acrylic latex paints also offer good gloss and color retention as well as good coverage that dries fast.
A: If the surface of your stucco is in good shape with no exposed substrate, possibly not. However, if you need to make a lot of repairs, using a primer will make your finish coat look great and provide the beautiful, long-lasting results you expect. Ask the experts at Sherwin-Williams to help you pick the right product for the job.
A: Once you’ve selected your coating, make sure you have the products you need to make minor repairs or fix cracks. Sherwin-Williams’ ConSeal Elastomeric Sealant or ConSeal Smooth & Textured Elastomeric Patches are excellent for repairing hairline cracks in stucco. The elastomeric properties of the coating keep it flexible to minimize the chance that cracks will reappear. After you’ve made your repairs, make sure the surface is clean and dry before you prime or paint.

Cutting-in, sometimes called trimming in, is a process of painting with a brush next to trim, mouldings or adjacent surfaces usually in preparation of using a roller to fill in the large areas of wall surface. The neatness and quality of the cutting-in can make or break the looks of a painting project. Through the years many gadgets have been invented to make this process simpler. Sometimes tape is used to mask over surfaces to protect them. 99% of painting projects do not require the gadgets or the hours spent masking off surfaces with tape. A neat, nearly perfect job of cutting-in can be done with only a good quality brush, some practice, patience and the following tips and techniques.
The goal is to create a clean, neat transition from one color or type of paint to another. These transitions occur where the moulding meet the wall or ceiling, or where two walls come together when using two or more colors. A crooked, sloppy transition detracts from an otherwise attractive paint job.
Due to lack of experience it is tempting to mask everything with tape, but tape does have its downsides.
NOTE: Masking tape is the tool to use for some decorative faux painting techniques like ragging or sponging. Use tape to create stripes and geometric shapes.
The paint brush used to cut-in is the key to producing good results. The most expensive paint in the world cannot be made to look good when applied with a poor quality paint brush. The best paint brush for cutting-in is a medium size premium paint brush. A 2 or 2 1/2 inch wide angle sash brush is wide enough to apply enough paint away from the edge for the roller to roll into. It is narrow enough to easily handle after a little practice. The brush should be the best. Some trusted brands are Purdy, Wooster, Corona Brush and Sherwin-Williams. Within these brands get the best brush available. It will pay off in the long run. For more tips and information about brushes see “Tools”. An angle sash paint brush will paint out a sharper edge. The bristles of an angle sash brush are cut at an angle, hence the name. Hold the paint brush similar to the way a pen or pencil is held. A premium paint brush will last a very long time. Clean it, care for it and it will paint many, many rooms.
Any paint can be applied neatly. It should flow out of the brush easily as the brush is dragged across the surface. Thinning the paint is usually required to achieve a consistency for good cutting-in. Thinning the paint does not harm the paint, just do not over do it. Remember most of the cutting-in is covered over by the roller so it recieves additional paint. Add the appropriate thinner (water for acrylics or mineral spirits for alkyds) a little at a time until the paint flows smoothly out of the paint brush when applied to the surface.

[vc_row][vc_column][vc_column_text]
Textured popcorn ceilings went out of style years ago, but many older homes—and some new ones—still have them. While taking down a textured ceiling is not that difficult, it is a messy job that requires hard work and special safety precautions.
There are two potential problems that can turn removing a textured ceiling into a DIY nightmare:
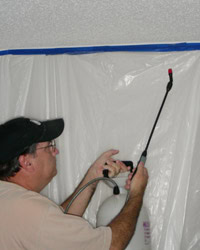
To determine if either of these conditions applies to your ceiling, combine a few drops of liquid dishwashing soap with warm water in a hand sprayer. Lightly spray a small spot in an inconspicuous location, and wait a few minutes for it to absorb the water. If the water will not soak in, the ceiling has been painted. Otherwise, the texture should come off easily.

To test ceiling texture applied before 1980 for asbestos, use a putty knife to scrape a small amount into a sealable plastic bag. If you’re concerned about the possible health risks involved in taking the sample, a testing service can be hired to come out and take it for you.
Send the sample to an approved testing service to see if it contains asbestos. To find a testing service in your area, contact the state environmental or health office. A directory of state offices can be found on the EPA website.
If the material is found to contain over 1% asbestos then by law you can not remove it yourself and will need to contact a professional asbestos removal company or leave the ceiling as is. Even if it doesn’t contain asbestos, it’s important to wear an appropriate dust mask or respirator when removing the ceiling.
To do the job you will need:

Removing a textured ceiling is a messy job so good prep work is important to keep from damaging your walls or floor and to make clean up easier.

Cover floor with plastic before spraying ceiling, and secure to walls with painter’s tape.

Run painter’s tape around the walls next to the ceiling, and attach plastic sheets to it.
Be sure to wear a dust mask or respirator and safety glasses, and keep the part of the ceiling you are working on damp to reduce dust.

Using a scraper to remove wet ceiling texture.
You’ll probably need to do some drywall finishing to the ceiling after the texture has been removed, including:
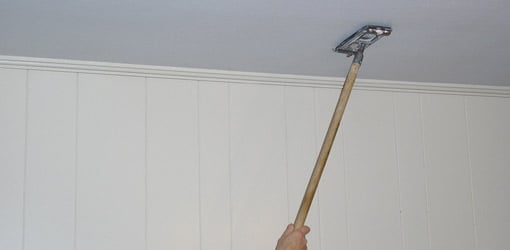
Sanding the ceiling with a long handled, drywall sanding pad.
Removing that dated popcorn ceiling will save a trip to the gym by giving your arms and upper body a great workout. In addition to your bulging biceps, the smooth ceiling will add value in your house and make all the hard work worthwhile.
Source – http://www.todayshomeowner.com/removing-textured-popcorn-ceilings/
[/vc_column_text][/vc_column][/vc_row][vc_row][vc_column][mk_fancy_title strip_tags=”true” size=”36″ font_family=”none” align=”center”]Some Great Videos On How To Remove Popcorn Ceiling:[/mk_fancy_title][vc_row_inner][vc_column_inner width=”1/3″][vc_video link=”https://www.youtube.com/watch?v=09Q4JQ3p8yg”][/vc_column_inner][vc_column_inner width=”1/3″][vc_video link=”https://www.youtube.com/watch?v=VzVpegoFV54″][/vc_column_inner][vc_column_inner width=”1/3″][vc_video link=”https://www.youtube.com/watch?v=lONjlVD17yU”][/vc_column_inner][/vc_row_inner][/vc_column][/vc_row]

[vc_row][vc_column][vc_column_text]Why do we find one place appealing and are uneasy in another? Why are we attracted to one product over another? Color—whether architectural or in products—accounts for 60 percent of our response to an object or a place.
The “buzz” about color is usually called “color psychology.” But the effects of color are subtle and significant; physical and psychological. Color use is not something that results in a definitive equation between “color and our moods,” as is a currently popular expression. Wherever we go we respond to color, but the importance of color is often underestimated. Color use is important to us personally in our homes and in the places where we work.
If you’re not sure where to begin with color, experiment in a powder room or bathroom, a small hall or area between rooms, or an accent wall. If you’re doing your own painting, pick an area that’s quick to do so you can see your results sooner, and be happy with it or change it. Look at the process as an adventure.
To get started, select a favorite color drawn from artwork, a rug, dishes and an accessory or furniture piece as a main color or accent.

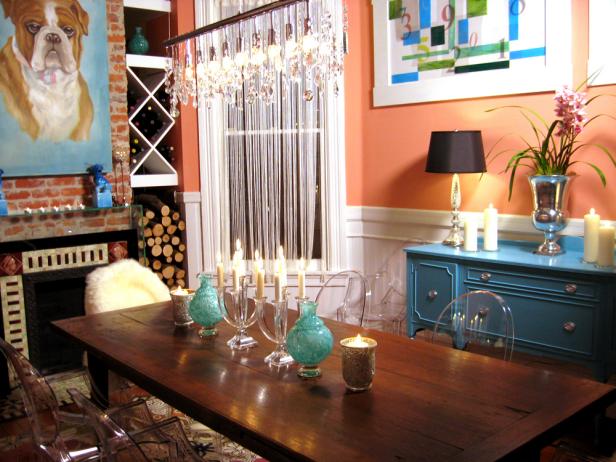
When selecting a color, consider the mood of a room. In a bedroom do you want the feeling to be restful and soothing or dramatic and intimate? Soft, cool colors and neutrals usually create a quieter feeling while stronger colors are for drama.
Do you want a dining area to feel sociable and stimulating or appear formal and quiet? Warmer, contrasting and somewhat brighter colors add to a sociable atmosphere; deeper blue-greens and neutrals will give a more formal ambiance.
Do you want kid’s rooms to create an active and exciting energy or an orderly and restful feeling? Be careful not to overstimulate your children with intensely bright hues. You may not know it, but some brighter colors can lead to unrest and irritability.
The reason why paint stores have light boxes for you to test paint chips:
So, a strong color might be too bright and overpowering when used on all walls or next to a large window, but it might be effective when used as an accent wall with indirect light.

Design by Andreas Charalambous
It helps to understand the terminology used to describe color.
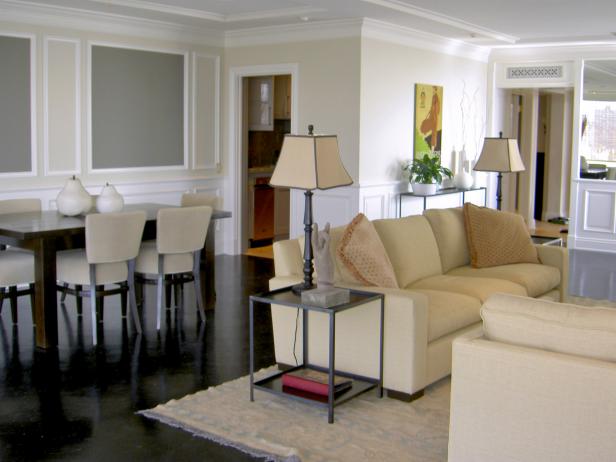
If you want a more active space, consider introducing stronger, more intense color. Even if you want a light-colored room, choose colors that are slightly more saturated than off-white or light pastel. Very light color can feel bright and stark when it appears on all surfaces in a room. However, two or more medium-light, closely related pastel colors can create a luminous effect when used in the same room.

Design by Shelly Riehl David
Boost your confidence by testing colors on poster board or large areas of a wall. Don’t be afraid to go beyond your comfort zone: Consider strong, vivid colors or soft, deep neutrals like chocolate brown or olive green as main or accent colors. Or add drama with a stronger color on the ceiling. Tinted ceilings can dramatically change the whole look of a room.

Design by Sherrill Canet
Transform flat, dull walls into interesting and personal spaces with subtle or dramatic visual texture and broken color. Burnished mineral/metal finishes and layered colored glazes add depth. Some examples of softly reflective metals are mica, copper, pewter, bronze and, of course, antiqued silver and gold.
Design by Payton Addison
Consider walls as planes of color, and see how they interact when viewing one next to the other in adjacent rooms. Approach it like a composition: You’re in one room, but you’re going to see a piece of another room through it. So as you’re choosing colors, consider how they will flow from room to room to create your picture.
Design by Amy Bubier
A small color wheel is a great reference tool for modifying and intensifying two or more colors. For example, red and green, which are complementary (opposite) colors, are most intense when used together. You may be surprised at how many combinations function beautifully together, and you may even become attracted to entirely new color palettes. The color wheel also illustrates the visual temperature of a color. Draw a line from the yellow-green mark on the color wheel all the way down to the red-violet; you’ll see that all the colors on the left are warm and the colors on the right are cool.
Number one color rule for a small space? There are no rules! Mixing colors can help bring a personal touch to your space.
Think one color is boring? Create bold or subtle variations within one color group with contrasting paint finishes. For example, use closely related colors, or try a single color in different finishes, for walls and trim in one space.
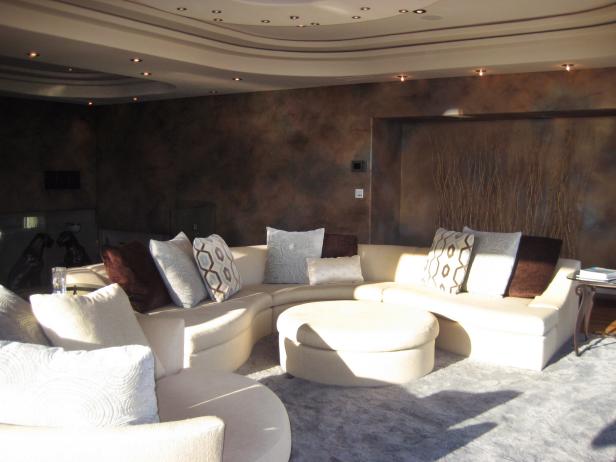
For an accent color, select a warmer (more toward reds) or cooler (more toward blues) color to complement your main color group. For a quieter ambience, make sure your colors are not extremely bright. White or an off-white tint can be a striking accent when used as trim with a monochromatic color group.
Design by Nicole Sassaman
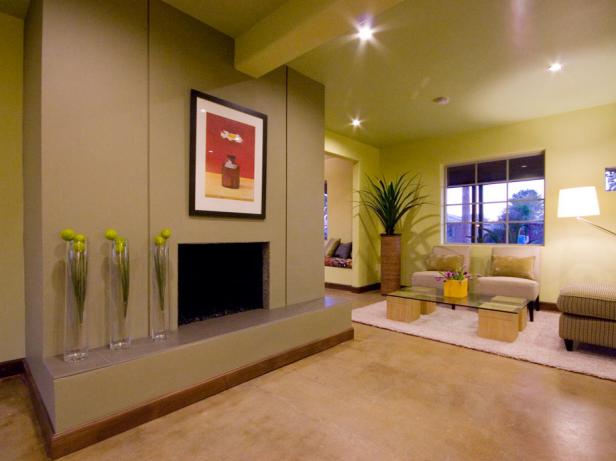
A single color used on walls and trim takes on new significance when applied in different finishes. For example, wall and trim colors can remain the same hue, but use an eggshell (matte and less reflective) finish on walls and a satin or semigloss on trim. The color will appear slightly different on each surface. It’s a good way to create a cohesive look in rooms with many windows and doors, and relatively little wall area.

Design by Lori Dennis
[/vc_column_text][/vc_column][/vc_row]
[vc_row][vc_column][vc_column_text]What can I say about this company, that hasn’t already been said!
From A to Z done with class!
Found my company for life!
Keep up the great service & work! Thank you
–From Google Reviews[/vc_column_text][/vc_column][/vc_row]

[vc_row][vc_column][vc_column_text]
Don’t be reductive when thinking about wallpapering. Your wall may appear flat, and your wallpaper may seem smooth, but without making proper preparations to your surface, your final result won’t look good.
The walls must be in good condition before you can hope to take a stab at putting on any wallpaper. This means that any imperfections like holes or cracks must be repaired, and any blemishes like mildew must be removed.
If the wall that you intend to lay wallpaper on has a preexisting coat of paint on it, you may or may not have a complication. There are two quick tests you can perform to check the condition of painted walls, and the results will either give you the green light to apply wallpaper or indicate that more preliminary work is needed.
To test your paint, hold a damp sponge against the wall for about 15 seconds. Then wipe the area with a cloth vigorously. If very little paint comes off, the painted surface is okay and should be capable of accepting wallpaper. If a lot of paint comes off, the walls should be washed thoroughly – or sanded and washed – to remove the paint before you attempt wallpapering.
The second test involves cutting three small Xs into the wall’s surface. Place a piece of scotch tape over each X shaped incision, and then yank the piece of tape off the wall. Once again, a small amount of paint transfer means that the surface is ready for the following steps, but a lot of paint coming off means you need to sand and wash the walls.
The ultimate goal in the preparation stage is to provide a smooth finish for materials such as wallpaper to adhere against. Walls painted with gloss or semi-gloss paints should be sanded to dull the surface.
For new drywall, be sure the areas along the joints and over nail heads are thoroughly cured and sanded smooth. New drywall should be primed with an opaque or a white primer.
All sanded surfaces should be primed before hanging wallpaper, and any stains like grease, grime, or adhesive residue from a previous wallpaper should be cleaned and primed with a stain killer or primer.
Wall liners provide some exception to this rule, as they allow wallpaper to be placed over rough surfaces like paneling and masonry block. This is still a risky option and should only be attempted under ideal conditions. Be aware that if you do plan to use wall liners, your choice of primer will be crucial, as you’ll need especially good adhesion between the surface and the wallpaper.
To determine the amount of paper you’ll need, first measure the height of the wall from the top of the baseboard to the ceiling or bottom of the molding. Next measure the length of each wall.
Add the measurements of the wall lengths together. Find the total number of square feet by multiplying the wall height by the combined length measurements.
If your wallpaper pattern does not repeat, or if it repeats every 0-6 inches, each roll yields approximately 25 square feet. If your pattern repeats every 7-12 inches, each roll yields approximately 22 square feet. This goes on depending on your pattern.
Divide the total number of square feet to be covered by the number that is appropriate for your pattern. This is the total number of single rolls of paper you will need for your wallpaper job.
Wallpaper is usually packaged in single or double rolls. To find the number of double rolls you need, divide the number of single rolls by two. To find the number of triple rolls you need, divide by three.
Ask a store associate for help if you’re unsure how much wallpaper to purchase even after these calculations.
Place (but don’t adhere) first strip of wallpaper to the right of a door or window. Using the edge of a door or window frame provides a definitive starting point and makes any break in the pattern of the paper less conspicuous.
Measure the width of the wallpaper and subtract 1/2 inch. This 1/2 inch reduction allows for the paper to overlap the adjoining wall.
Mark the width of the wallpaper less 1/2 inch on the wall to the right of the door or window where you will begin. Line up a level on this mark and draw a pencil line lightly from the ceiling to the floor. You may need to reposition your level several times. Be sure to line it up carefully each time.
Wallpaper paste or wallpaper adhesive can come in liquid form or as a dry, flake-like product that can be activated with water. Either will act as the bonding material that allows your pattern to stick on the wall.
If you are using paste, read the manufacturer’s instructions carefully and follow them exactly. Always use cold water to mix paste. Mix it thoroughly to be sure it is free of lumps.
TIP: Tie a string across the top of your paste bucket where you can attach a brush. This string will keep your brush clean and also give you an edge to slough off excess paste each time you dip the brush.
Cut the first strip of paper 4 inches longer than the wall height. Unroll another section and match the pattern before cutting the second strip.
Study the pattern carefully and always match it before cutting. Your first strip will set the bar for how your pattern looks. All subsequent strips should be matched visually while they are still attached to the roll as once they are cut, a mismatch will stay exactly that.
It is usually wise to cut no more than two or three strips of paper before applying them.
Unroll the strip of wallpaper on your work surface with the pattern side down. Brush an even layer paste on the non-patterned side so that it covers about 2/3 the length of the strip. Brush the paste out evenly and not too thick.
TIP: Add a few drops of food coloring to the paste to tint it slightly. This will make it easier to judge the thickness of the paste and detect any missed spots.
Fold the pasted end of the paper back about 2/3 of the length of the piece so that you put the pasted side to the pasted side, avoiding any creases.
Slide the paper forward on the work surface and apply paste to the remaining 1/3 of the piece. Fold it back over in the same manner. This process where you glue each end of the wallpaper and then fold it back in toward the middle is known as “booking” the wallpaper.
Once you book the wallpaper, allow about five minutes before using the piece. If you have to stop or will not be using the strip right away, place it in a plastic bag to keep it moist.
Pre-pasted wallpaper already has an adhesive applied on its backing. The bonding properties of this product are activated when you run the pre-pasted paper through clear water. Plastic and metal dip troughs for pre-pasted paper are available. Cut a piece of pipe or dowel rod an inch shorter than the trough. Lay it in the bottom of the trough over the paper. It will hold the paper under water as you pull it out.
Carry your long strip of pasted wallpaper from your work surface over to the wall. Drape the folded paper over your arm like a coat. Never open the paper until it is in position to hang.
Use extreme care when placing the first strip of paper on the wall, since all other strips of paper will be aligned to this first one.
Most manufacturers recommend the butt joint. It leaves no ridges at all, but requires a little extra care to make. The edge of one strip is butted up against the edge of an adjoining strip. If you force the two edges together too tightly, it will form a ridge. If they are not placed together tightly enough, you will leave a gap between the two edges. Use the palms of your hands when positioning the paper. Try not to pull on the edges.
It may be necessary to trim the edge of the paper to ensure a proper fit. You can trim the paper with a razor knife and a straightedge.
When the paper is in position for hanging, unfold the top half of the pasted sheet. Overlap the top edge of the pasted paper at the top by about 2 inches. You’ll cut away this overlap in the trimming process.
Hold the edge of the paper with one hand and pull the pasted fold apart. The pasted side of the paper should be held firmly against the wall. Reposition the strip as necessary so that the right edge of the paper lines up with the pencil line you made previously.
Use a smoothing brush to smooth out the top and bottom. Allow the bottom of the paper to fall of its own weight. Brush it out evenly. If you trap some air behind the paper, smooth it out with the brush. If this does not work, pull the paper away from the wall.
Continue to apply each sheet of paper in this same manner. Use care to align the design in each succeeding sheet.
Trim off the surplus paper at the bottom and top of each strip. Use a metal paint edger or broad knife and a razor knife to get a clean edge. Change the blade on your knife every strip for better results.
Use clean water to rinse all baseboards, casings, etc., with a damp sponge before the paste dries.
Let the paper dry about 15 or 20 minutes, then roll all seams. Use a regular wallpaper roller and roll thoroughly for a neat job. Do not apply too much pressure; you may form paste ridges under the paper or force the paste out through the seam.
At the corners, measure from the last full strip of wallpaper to the corner and add 1/2 inch. This 1/2 inch will allow the strip to go into the corner and onto the adjoining wall by 1/2 inch. If your walls are not running straight up and down, you may want to use 1 inch instead of 1/2 inch.
A small slit at the top and bottom of the piece in the corner will make it easier to go around the corner.
For the next piece, measure out the width of the wallpaper from the corner and make a pencil mark. Use your level and make another perfectly straight line from the floor to ceiling as before. This piece will overlap the 1/2 inch strip on the wall from the previous piece installed. For vinyl wallpaper, use a vinyl-to-vinyl adhesive on these corner seams.
Be especially careful when trimming paper along the edges around fireplaces, windows, mantelpieces, etc. Sometimes the weight of the paper causes it to tear at its narrowest point.
For outside corners, measure the distance from the last full strip to the corner. Add 1 inch to this measurement. Measure the width of the paper and add 1/2 inch. Measure out from the corner the width of the paper and add 1/2 inch. Make a pencil mark on the wall. Using your level, again draw a light pencil line from the floor to the ceiling. Align your wallpaper with this line and match the pattern as closely as possible. This piece will overlap the last piece by 1/2 inch.
For doors and windows, hang the paper over the edge. Using your razor knife cut away the excess wallpaper. Making small cuts from the corners of the doors and windows toward the center will help you position the wallpaper around these obstacles. After the paper is smoothed, use your edger and razor knife to trim around the doors and windows.
Since all the switch-plates, outlet plates, etc. were removed before papering, you can apply the wallpaper right over these openings. The wallpaper can then be cut with the razor knife and straightedge. Replace the fixture plates for a finished job.
Credit – http://www.doityourself.com/stry/h2wallpaper[/vc_column_text][/vc_column][/vc_row]

Ceilings are the most difficult areas to paint, but well worth the effort. With a few simple steps ceiling painting can be much easier and produce better results. Many of the same procedures when rolling ceilings are the same as the walls.
The general plan for painting ceilings is to prepare the room, repair any damage, cut in the edges with a brush and then apply the paint to the large areas. The best plan is to finish the entire ceiling painting in one session. Allowing the paint to dry at different times will produce visible lap marks.
Before starting the ceiling painting remove as much furniture as possible, any remaining pieces need to be moved to the center of the room.
 Cover the entire floor with good drop cloths and the furniture with lightweight plastic.
Plastic on the floor will not work. It won’t stay put and will stick to your feet.
Place masking paper over the tops of the window and doorframe. Also cover any windowsills. These areas can be completely covered with plastic masking film for extra protection. Use a hand held masking machine for the paper and plastic.
Any remaining items will need to be covered with light weight plastic. Hanging pictures and unmoved furniture are good examples. Completely covering the walls is not necessary if a quality roller cover and quality paint is used.
 Remove the light fixtures if you are confident in doing so. If not, loosen the fixture so you can easily brush around it, dropping it a small distance from the ceiling.
This will speed up the time to cut around the fixture with a brush. Drape plastic or masking paper over the light fixture to protect it from any splatters.
A ceiling fan can be masked with either masking paper on the blades or draped with plastic and taped secure. Most fans have a removable cover over the motor. Remove this cover if possible.
Repair drywall cracks and any damage before proceeding with the ceiling painting. Stains from water damage need to be sealed with a stain blocking primer. Apply 2 coats to be sure the stain is fully sealed. Use an appropriate interior primer for your particular situation.
The best tools are the same as for painting walls. Use a 9-inch paint roller frame and a lambs wool roller cover.
The thickness of the cover depends on the amount or lack of texture on the ceiling, 1/2 inch for smooth and 3/4 inch for textured ceilings.
A roller pole is necessary and will save you a lot of time and effort. Choose a roller pole that is comfortable to use and extends far enough to reach over any obstacles.
To complete a professional roller set-up use a 5-gallon bucket and roller screen instead of a pan. A good paintbrush is needed to cut-in the edges and around any light fixtures. A 2-1/2—3 inch brush will work well. Use a size and style you are comfortable using.
Good tools are as important as quality paint.
The type of paint and sheen will affect the overall appearance of the ceiling.
Typically top quality acrylic paints are thick and will need to be conditioned before use. Add a paint conditioner, such as Flotrol, instead of water. Water will make acrylic or latex paints splatter and drip more. For oil base paints use Penitrol instead of mineral spirits. Most oil base products won’t need any conditioning for rolling.
For most ceilings I like to use a brush and roller. Of course a ceiling can be sprayed using an airless sprayer. I recommend this method for painting acoustic ceilings. Choosing to spray a ceiling will require a lot more masking and covering.
Painting ceilings with a brush and roller is a very “user friendly” method, needing the least experience and investment in tools. The steps needed are brushing next to the walls then rolling the paint using an efficient pattern. Brushing should occur first, if one coat of paint will be applied. For two coat applications quickly roll the ceiling then cut-in twice while waiting for the ceiling to dry.
Start by cutting in the edge of the ceiling at the walls with your brush. Bring a strip of paint out on the ceiling 3-4 inches wide. If the light fixture is accessible cut it in as well. If not, brush around it at the end of the ceiling painting.
Careful and slow brushwork is needed in order to have a straight line. Take your time.
Tape doesn’t work very well, but can act as a guide making this task a little easier. Try to apply the smallest amount of paint possibe next to the tape, dry brushing, to reduce the amount of seepage under the tape.
Roll in a straight-line pattern. The use of a “W” or “V” pattern will spread the paint too thin and is more work than necessary. A straight pattern applied opposite of your main viewing angle will help hide any roller marks. By applying the paint in sections and working back and forth towards the door a wet edge can be maintained.
 |
 |
Begin rolling the ceiling parallel from the wall opposite of the entry door. An average stroke of the loaded roller will be 4-6 feet. This is about a third of the width of most rooms. Paint a section, 4×4 or 6×6 area, and then move over and repeat.
Blend each section while rolling by continuing each stroke into the previous section, overlapping 6 inches will be enough. Keep repeating this back and forth pattern until finished.
Rolling this way works great for smooth ceilings and paints that have a sheen, such as satin and semi-gloss. Ceilings without any texture are the most difficult to paint. Textured ceilings, orange peel and knockdown, are much easier.
Don’t press to hard on the roller. This will produce unnecessary splatters and drips. Plus, leave lines of thick paint coming off the ends of the roller cover.
Experiment on the first couple of strokes. Be careful when rolling close to the walls. To help this situation roll a band of paint next to the wall, do this as you roll a section. This will extend the brushed areas another 9 inches.
 Painting a vaulted ceiling with a roller is exactly like painting a wall. Cut-in all edges including the peak. Brush the paint 4-6 inches out from the corners and pay special attention to areas that can’t be reached by the roller.
Begin applying the paint near a corner. Spread the paint in a straight-line pattern, overlapping each stroke into the previous one. Paint 1/2 of the ceiling at a time. Reduce the chance of hitting a wall by rolling slowly as you near the wall.
Source – http://www.house-painting-info.com/articles/ceiling-painting/


Few home-maintenance projects are as important as exterior painting because paint and caulking form the first line of defense against rain, snow, and ice. And a nice paint job will enhance the curb appeal and resale value of your home, too.
You want to repair and repaint as soon as you notice paint starting to crack, blister, and peel. Ignoring these problems will lead to a much more extensive—and expensive— job. Below are seven exterior painting tips every homeowner should know, whether you’re planning to paint the house yourself or hire a pro.

There are two basic types of exterior paint: water-based latex and oil-based alkyd. Latex cleans up with soap and water, dries quickly, has low odor, and remains flexible longer so it’s less likely to crack. The best quality latex paints contain 100 percent acrylic resins.
Alkyd paints require mineral spirits (paint thinner) for cleanup as opposed to just soap and water. But many professional painters prefer alkyd paint because it’s durable, stain-resistant, flows very smoothly, and dries with fewer brush marks. But alkyds have a strong solvent smell and dry very slowly.
The one you choose is up to you. Just remember that if you’re applying latex paint over an existing alkyd paint, you must first prime the surface to ensure the new topcoat will adhere to the old oil-based paint.
Paint Prices
There’s no absolute formula for picking the best paint for your home. Most paint manufacturers offer a wide variety of paints ranging from good to better to best. As a general rule, budget how much you want to spend on the project and then buy the best paint you can reasonably afford, because cost is an excellent indication of quality. Expensive paints contain more pigments than bargain paints, so they produce a thicker, longer-lasting, more protective coating.
Read the Label
Few homeowners bother reading the tiny print on the paint can label, but they should. There’s a wealth of information printed right on the can that can help you produce a beautiful paint job. Pay particular attention to the instructions about prepping the surface and outdoor air temperature. Most paints shouldn’t be applied when the temperature is 50 degrees F or colder. But some paints are specially formulated for application when the temperature is as low as 35. Just take the time to read the label before you start painting and before the label becomes smeared with paint and impossible to decipher.

For the new paint to adhere to the surface, you must clean the house’s exterior of all dirt, grime, mildew, and chalky residue. A power sprayer provides the easiest way to accomplish this, but hand scrubbing with a stiff-bristle brush is just as effective and often doesn’t take much longer because it requires little preparation and setup time.
Use a hammer and a nail set to tap all nailheads below the surface, then fill the holes with exterior-grade putty. Once the putty is fully cured, sand it flush. If you’re applying new caulking around windows, doors, and trim, be sure to use a caulk that’s paintable.
You can paint directly over the old painted surface as long as it’s in good condition. Be sure to scrape and sand any spots where the old paint has blistered or flaked off. And you must prime any bare wood before you paint it.

The fastest, most effective way to apply exterior paint is with both a paintbrush and a roller. Brush paint onto narrow surfaces, edges, and smaller areas, and use a short, small-diameter roller to paint large and long surfaces such as siding and trim.
Start in the Shade
Painting in direct sunlight or applying paint to a sun-baked surface will make fresh paint dry too quickly. As a result, it won’t adhere well and will blister and flake prematurely. So begin painting on the shady side of the house. (If the surface is damp, wipe it dry.) Then wait for sun to move and the other sides of the house to become shaded—or just paint on an overcast day.

Start painting near the top of the house and work your way down. Apply paint to the butt or bottom edge of the siding first, then paint the broad surfaces. To avoid lap marks, always try to brush from one wet surface onto another wet surface. When that’s not possible and you must paint onto a previously painted and dried surface, overlap onto the dried-paint surface by several inches.
And since you’ll be working high up, don’t forget basic ladder safety: Don’t overreach too far to the side or you might topple over. Try to keep your hips within the horizontal rails of the ladder. It’s much smarter to climb down, move the ladder, and climb back up than to risk falling.